“I hooked up my accelerator pedal in my car to my brake lights. I hit the gas, people behind me stop, and I’m gone.”–Steven Wright
How to change brake pads was one of the last things my dad taught me before I moved away to college. Changing brake pads is not as difficult as it may sound — in fact, you can save hundreds of dollars by changing your own brake pads instead of having it done at a shop.
Here is an easy to read step by step set of instructions for changing your brake pads.
Disk brakes work like fingers catching a spinning frisbee — the pads of your fingers catch the spinning disc and the friction between the frisbee and your fingers stops the spinning.
Disk brakes work by squeezing the tire from both sides in order to provide enough friction to bring your car to a stop. Brand new brake pads are about as thick as a Snickers bar, but after a few thousand miles (usually 10-12 thousand depending on the brakes and your driving habits), the brake pads are shadows of their former selves and need changing.
You could go to a shop and spend anywhere from $200 to $800 for this repair, or head down to your local car parts store and pick up a set of brake pads for around $40 and “do it yourself”.
Your box of brake pads will come with a certain number of brake pads (I recently changed the pads on my front tires, so my pack contained four pads), a certain number of “anti squeal” metal shims, and usually a lubricant or lubricating powder.
Truly, once you purchase the brake pads and jack your car up, the work is halfway done.
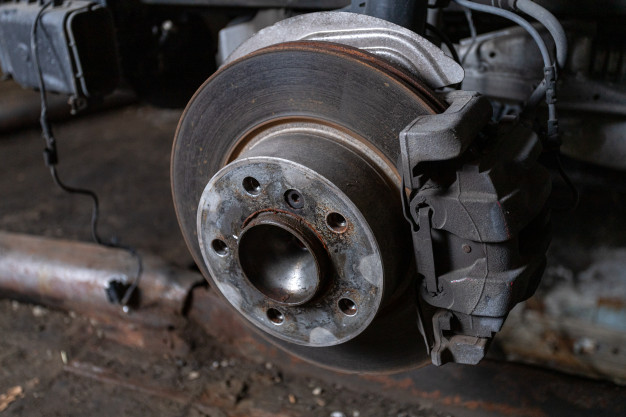
After your car is jacked up (in a safe place with the parking brake on) and the rim and tire is removed, you’ll see a monstrous contraption hanging over the brake rotor.
This is the “brake caliper”, and we need to get inside there to do the bulk of our work.
To remove the brake caliper, locate the caliper mounting bolts — there are usually two, one at the “top” and one at the “bottom”. Once these bolts are removed, the brake caliper will swing up or out to reveal the brake pads sitting on either side of the brake rotor.
Tie back or position the brake caliper securely so it doesn’t come clamping down on your hand or snap back and bend the brake caliper flex hose.
The brake pads sit on either side of the brake rotor like rusty little pieces of toast.
You can pull them out (on some car models there will be “secondary brake caliper bolts” to remove, so watch out for extra bolts) and take a look at them. Most likely, you can see the wear and tear these little guys have taken.
Most of the job is now done. Simply install the new brake pads (and anti squeal shims) where you took the older pads out of.
Make sure these new pads aren’t wiggling too much or aren’t too tight against the brake rotor. They should feel snug, but not under pressure.
Once you’re sure that you’ve installed the brake pads properly, close the brake caliper, re-attach the caliper bolts, replace the rim and tire, and jump up in the air with your head held high. You just installed your own brake pads and saved a ton of money.
Before you go driving off into the sunset, there’s an easy safety test you can do to make sure you’ve installed the pads correctly.
Once you’ve gotten your car off the jack, sit behind the wheel and press the brake pedal. If the pedal doesn’t return to its normal position or has “funny” action, there’s probably something wrong with your brake, and you need to take the whole tire off and open the housing again to make sure you’ve installed everything correctly. Never drive a car without certainty that the brakes are working.